Events are one of the most powerful assets which should be added to your marketing strategy. If you want to host an event and add a list of available events, the WP Events plugin gives you an easy way to add them to your WordPress site.
How to add a new event?
Follow these steps and add the events to your website.
Step 1: Navigate to WP Dashboard > Events > Add new

Step 2: Add Event title and Event description

Step 3: Insert Event details
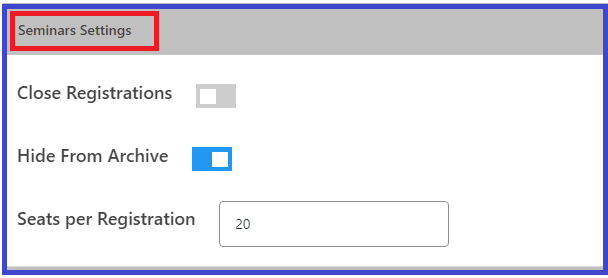
Seminars Settings
All event-related settings are available here. These settings are ONLY applicable to this event.
- Close Registrations: Enable the “Close Registrations” tab if you want to close event registrations even if seats are left.
- Hide From Archive: Enable the “Hide From Archive” tab if you want to hide the event from the archive page.
- Seats Per Registration: Set the maximum number of seats from here that a user is allowed to register for.
Step 4: Insert Event details
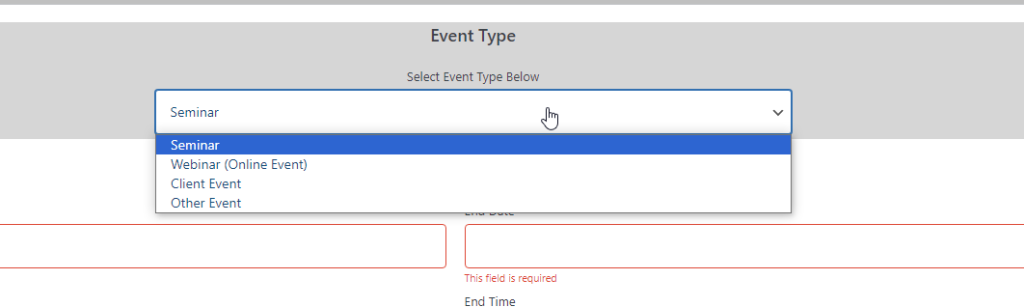
Event details – Event Type
Select event type from the dropdown. I-e:
- Seminar
- Webinar
- Client Event
- Other Event
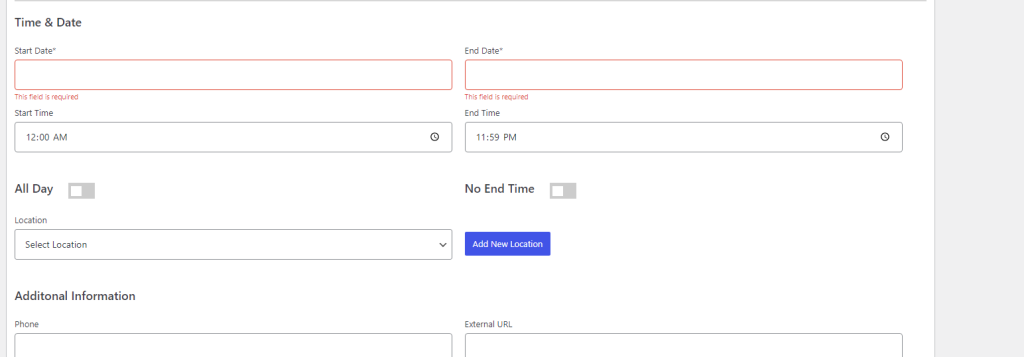
Event details – Time & Date
- Start & End Date: Add the starting and ending dates of the event.
- Start & End Time: Add the starting and ending times of the event.
- All day: Check this checkbox if you want the event for all day with no end day
- No End Time: Check this checkbox if you want the event with no end day
Event details – Location
- Location
- Choose the location from the dropdown which you have already added here.
- Add new location: Insert complete venue details of event I-e: Venue, Address, Country, City, State, and Zip code.

Add new location
Click add new location button

Please note: Maps feature under locations will be disabled if the API field in settings is empty.
Hit “Save Location” If you want to use it later too for any other event too.
Event details – Additional Information
- Phone: Add your phone no, if necessary.
- External URL: Add any external URL where you want to redirect your user, if necessary. (User will be redirected here for registration).
- Available Seats: Insert the total no of users for whom you are going to host the event i-e: 10, 25, 50.
- Remaining Seats: Read-only field to show remaining seats for your event.
- Map URL: Add address link to integrate with Google Maps.
- Confirmation Mail Message: Add a customized confirmation mail message here.

Contact person
These email notifications are a type of triggered email that will be sent in response to any form submission. The user which you will select from the drop-down will receive an email notification when someone registers for the seminar.

Assign category if required
You can select a category from the dropdown if required

All done!
Now, select the visibility type:
- Public: The event will be visible to everyone
- Private: Only site admins and editors can see the event.
- Password Protected: Add the password. Then, only those can see the event details who have the password.

Once done, hit the Publish button.
Your event is ready to go and will be live!
